To set up your email account in Microsoft Outlook 2010 or 2013, follow these steps:
- Open Outlook 2010.
- Click on the File tab to access the Backstage view.
- Click on Account Settings and Add and remove accounts or change existing connection settings.
- In the Account Settings window click on the New button.
- Select the Manually configure server settings or additional server types checkbox, click Next.
- Select Internet E-Mail radio button, click Next.
- Fill in all necessary fields to include the following information:
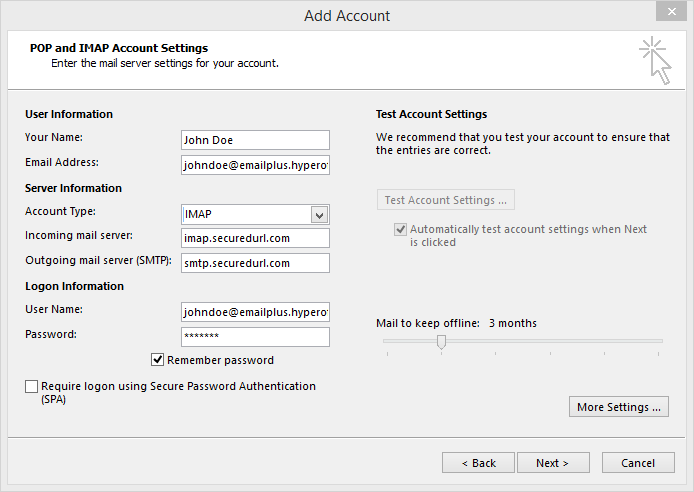
- Your Name: Enter your name as you would like it to appear in the "From" field of outgoing messages.
- Email Address: Enter your full email address (username@your_domain.com)
- Incoming mail server (IMAP): imap.securedurl.com
- Outgoing mail server (SMTP): smtp.securedurl.com
- Login Information:
- User Name: Enter your full email address
- Password: Password used to log into the portal
- Click on More Settings to complete account setup.
- Select the Outgoing Server tab.
- Select the "My outgoing server (SMTP) requires authentication' checkbox"
- Select Use same settings as my incoming mail server.
- Do not check Log on using Secure Password Authentication (SPA)
- Select the Advanced tab.
- Verify Server Port Numbers:
- Incoming Server (IMAP): 993
- Outgoing Server (SMTP): 465
- Click OK, then click Next to complete the IMAP setup.
To assign the Sent Items and Deleted Items folders in Outlook 2010:
- Go to File -> Account Settings -> Account Settings… -> double-click on the IMAP account.
- Click on More Settings…
- Select the Sent Items tab.
- Enable the option “Save sent items in the following folder on the server.”
- Select the folder "Sent Items" to have Outlook save sent mail in the IMAP account.
- Click on the Deleted Items tab.
- Select the Trash folder.
In Outlook 2013, Microsoft removed the option to pick a Sent Items and Deleted Items folder. Sometimes Outlook detects the folders already set up in an account, sometimes it does not. If upgrading to Outlook 2013 from Outlook 2010 and folders have already been assigned, those settings typically migrate into Outlook 2013.
To set up IMAP on Outlook 2011 for Mac, follow these simple steps:
- Click on the Microsoft Outlook app.
- Click on the Outlook menu, select Preferences..., then click on the "+" on the lower left corner to add an account.
- Click E-mail Account.
- Fill in the following information:
- Email Address: Enter your full email address (username@your_domain.com)
- Password: Password used to log into the portal
- User Name: Your email address
- Type: IMAP
- Incoming Server: imap.securedurl.com
- Outgoing Server: smtp.securedurl.com
- Click Add Account.
- Under the Outoing Server settings, click on More Options... and select Use Incoming Server Info for authentication.
- Click OK.
To have the sent, deleted and junk mail folders mapped to the same folders in your portal, read this Microsoft support article.
To set up an IMAP account on Microsoft Entourage, follow these steps:
- Open Entourage. From the Tools menu tab (on the top toolbar), select Accounts.
- Click on the down arrow next to the New button and select Email account.
- Bypass the automatic configuration and choose to configure the account manually.
- From the Account type menu, select IMAP and click OK.
- The Edit Account window appears. Type the following information in this window:
- Your Name: Name that will appear on outgoing messages
- Email: Your full email address
- Account ID: Your full email address.
- NOTE: Do not enter only a username. A full email address is required to access the portal's mail servers.
- IMAP server: Your Service Provider's IMAP mail server (e.g. imap.hyperoffice.us)
- Password: Password used to log into the portal.
- Save Password: Select this option to prevent entering the password every time you email is checked.
- SMTP server: Your Service Provider's SMTP mail server (e.g. smtp.hyperoffice.us)
- Click the button labeled "Click here for advanced sending options," then select the SMTP server requires authentication option and Log on using option. Complete the User Name and password fields.
- Click OK to complete your IMAP account setup.
To set up email in Microsoft Outlook 2007, follow these steps:
***Microsoft support for Outlook 2007 ended on 10/9/12; we cannot guaranteed functionality.***
- From Microsoft Outlook 2007, select the Tools menu and select Accounts.
- Note: If not visible, the accounts menu may be hidden. To un-hide it, click on the small downward arrow at the bottom of the Tools menu to reveal hidden menu options.
- On the Account Settings page, the E-mail tab at the top should already be highlighted. Click the New button.
- Select the Manually configure server settings or additional server types option and click Next.
- On the Choose E-mail Service page, select the first option for Internet E-mail and click Next.
- Under the Internet E-mail Settings screen enter:
- User Information: Type your first and last name (what you want to appear in the "From" line when you send email to the other recipients)
- Email Address: Enter your full email address (username@your_domain.com).
- Incoming Mail Server (IMAP): imap.securedurl.com
- Outgoing Mail Server (SMTP): smtp.securedurl.com

- Logon Information:
- In the Username field, type your full email address
- Type in the password used to log into the portal
- NOTE: Do not enter your username only. A full email address is required to access the portal's mail servers.
- Click the More Settings button. The Internet E-mail Settings dialog appears:
- Click the Outgoing Server tab. Select the My outgoing server (SMTP) requires authentication option.
- Select the Log on using option and complete the User Name and Password fields.
- Select the Advanced tab.
- Set the IMAP port to 993.
- Set the SMTP port to 465.
- Slide the Server Timeouts to 1 minute.
- Click OK.
- The main email accounts setting window appears.
- Click Next to continue the settings
- Click Finish to complete the IMAP account set up.lder as the Sent Items folder in Outlook 2007;
- First make sure there is a Sent Items folder in your IMAP mailbox.
- If you have not subscribed to the Sent Items folder yet, go to:
Tools-> IMAP folders…and subscribe to your Sent Items folder
- If you have not subscribed to the Sent Items folder yet, go to:
- Open your IMAP account settings via:
Tools -> Account Settings… -> double click on the IMAP account. - Click on More Settings…
- Select the Sent Items tab.
- Enable the option “Save sent items in the following folder on the server”
- Select the Sent Items folder to have Outlook save sent mail to your IMAP account.
To set up email on Microsoft Outlook 2003, follow these steps:
- From Microsoft Outlook, select the Tools menu and select Email Accounts...
- Select Add a new e-mail account and click Next.
- Select IMAP and click Next
- Fill in the necessary fields as follows:
- Your name: Your name as you want it to appear in the From box in emails.
- E-mail Address: Your full email address (This email address is being protected from spambots. You need JavaScript enabled to view it.)
- Incoming mail server (IMAP): imap.securedurl.com
- Outgoing mail server (SMTP): smtp.securedurl.com
- Username: Your full email address (This email address is being protected from spambots. You need JavaScript enabled to view it.)
- Password: Your portal password
- When you have completed the information in step 4, click the More Settings button. The Internet E-mail Settings dialog appears.
- Click the Outgoing Server tab. Select the My outgoing server (SMTP) requires authentication option.
- Select the Log on using option and complete the User Name (your entire email address) and Password fields.
- Select the Advanced Tab.
- Set the IMAP port to 993.
- Set the SMTP port to 465.
- Slide the Server Timeouts to 1 minute.
- Click OK.
- The main email accounts settings window appears. Click Next to continue the settings.
- Click Finish to complete the IMAP account setup.
To set up email on Apple Mail, follow these simple steps:
- Launch Mail
- Click on the File menu and select Add Account...
- Select Select Other Mail Account...and click Continue
- Fill in the following information:
- Full Name: This is what recipients will see as the sender
- Email Address: Enter your full email address (username@your_domain.com)
- Password: Password used to log into your portal
- Apple Mail will prompt you to configure your account manually - click Next
- On the next window, fill-in the following information, then click Next:
- Account Type: IMAP
- Mail Server: imap.securedurl.com
- Username: Your full email address address
- Password: Password used to log into your portal
- If you see the next window, fill in the following information, then click Next
- Port: 993
- Use SSL
- Authentication: Password
- In the next window, fill in the following information, then click Create
- Outgoing Mail Server: smtp.securedurl.com
- Username: Your full email address
- Password: Password used to log into your portal
- Outgoing Mail Server: smtp.securedurl.com
NOTE: To map the server-hosted sent, deleted and junk mail folders to Apple Mail, read this Apple support article.
***Apple Mail does not support nested Inbox folders. To use Apple Mail, move any folders you have nested under the Inbox to the same level as the Inbox.***
To set up email on Thunderbird:
- Click on Create a new account.
- On the "Welcome to Thunderbird" window, click on Skip this and use my existing email.
- On the following screen, enter the following information:
- Your name: Enter the name you would like displayed for recipients
- Email address: Enter your email address
- Password: Password used to log into the portal
- Click Continue.
- On the next screen, click on Manual config.
- Configure your account as follows:
- Incoming Server Hostname: imap.securedurl.com
- Port: 993
- SSL: SSL/TLS
- Authentication: Normal password
- Outgoing Server Hostname: smtp.securedurl.com
- Port: 465
- SSL: SSL/TLS
- Authentication: Normal password
- Username: Enter your email address
- Click Done to complete setup.
To set up your iPhone, iPad, or iPod Touch to receive mail, follow these steps
-
On the device home screen, tap Settings, then tap Mail, Contacts, Calendars
- Tap "Add Account" and select Other as the type of account and then Add Mail Account.
- Enter your name as you would want it to appear on your outgoing email, your full email address, password, and a description of your own choosing to remember this email account.
- On this screen, enter:
Incoming Mail Server: Enter imap.securedurl.com or the address provided by your Service Provider
User Name: Your full email address
Password: Password used to access your Portal
Outgoing Mail Server: Enter smtp.securedurl.com or the address provided by your Service Provider
User Name: Your full email address
Password: Password used to access your Portal
- Tap "Next" at the top of your screen again and deselect "Notes".
NOTE: Unless you wish to delete all the existing contacts and calendars on your phone, select the "Keep on my iPhone" option when prompted. There may be duplicate contacts on the device as a contact can exist on the local "On My iPhone" account as well as in the newly created email account. Optionally, iOS can link contacts to display as a unified contact in the address book.
Upon successful configuration on the iOS device, email synchronization will begin automatically.
To set up email on an Android phone or tablet, follow these steps:
- From the Home screen, click Settings icon
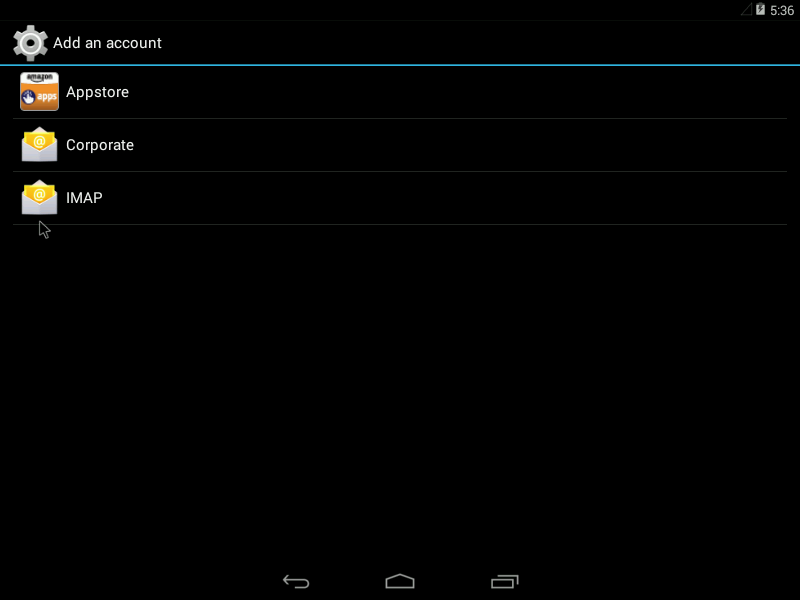
- Select "Add account"
- Select IMAP
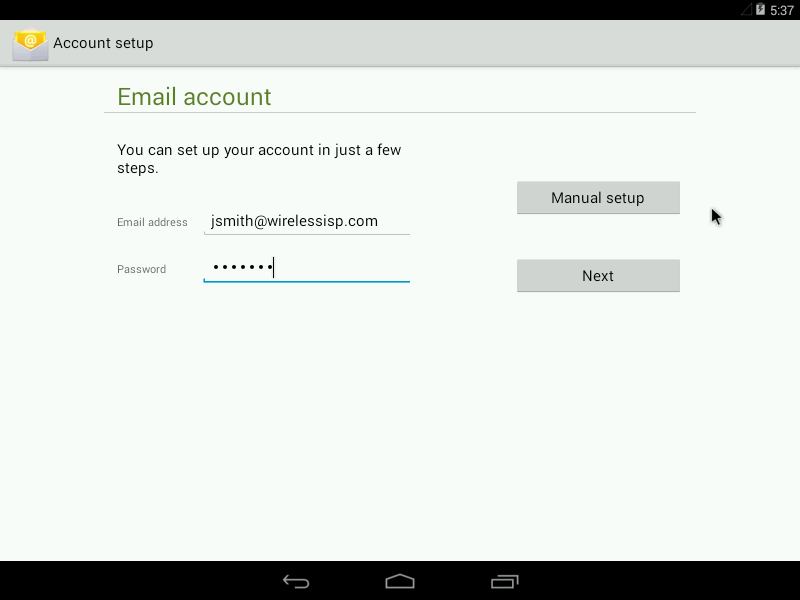
- On the following screen, enter your full email address and password and click, "Manual Setup"
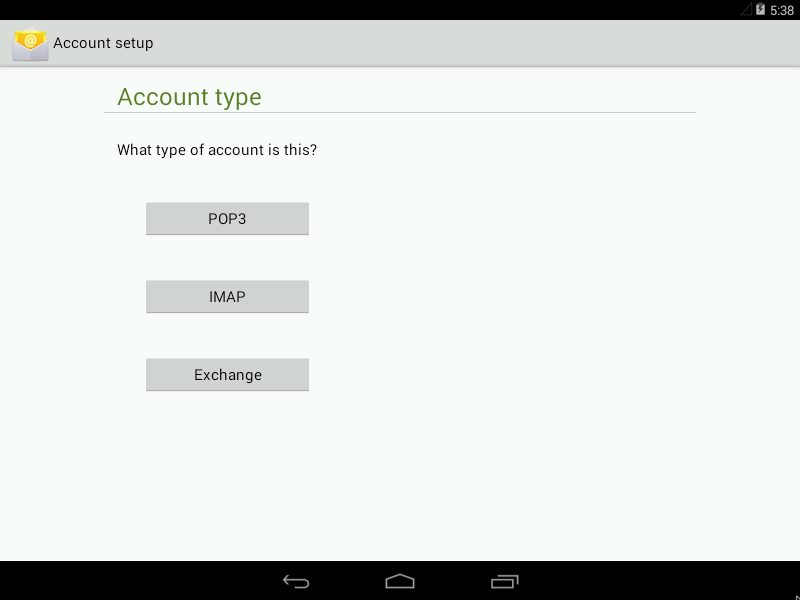
- Select IMAP
- One the following screen, enter and verify the following information:
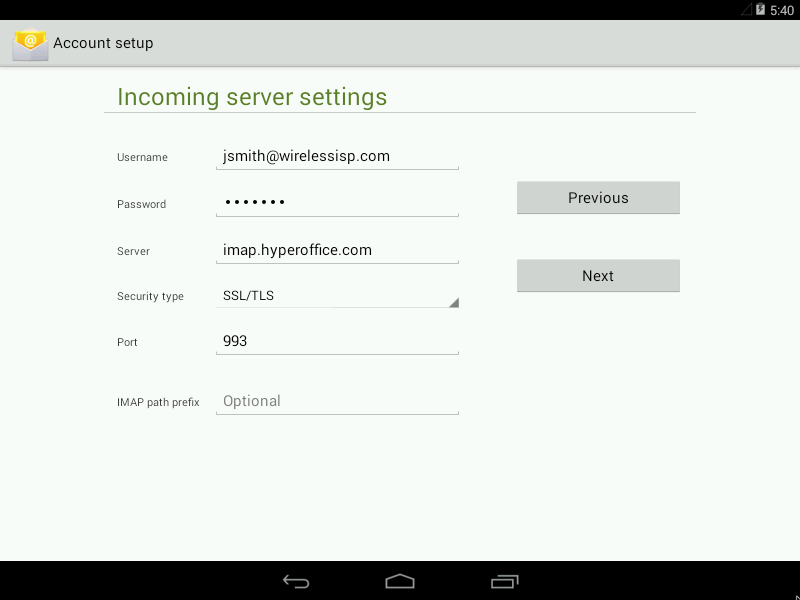
- Username: Enter your entire email address
- Password: Password used to log into your portal
- Server: imap.securedurl.com or your Service Provider's IMAP mail server
- Security Type: SSL/TLS
- Port: 993
- Click Next
- On the following screen, enter and verify the following information:
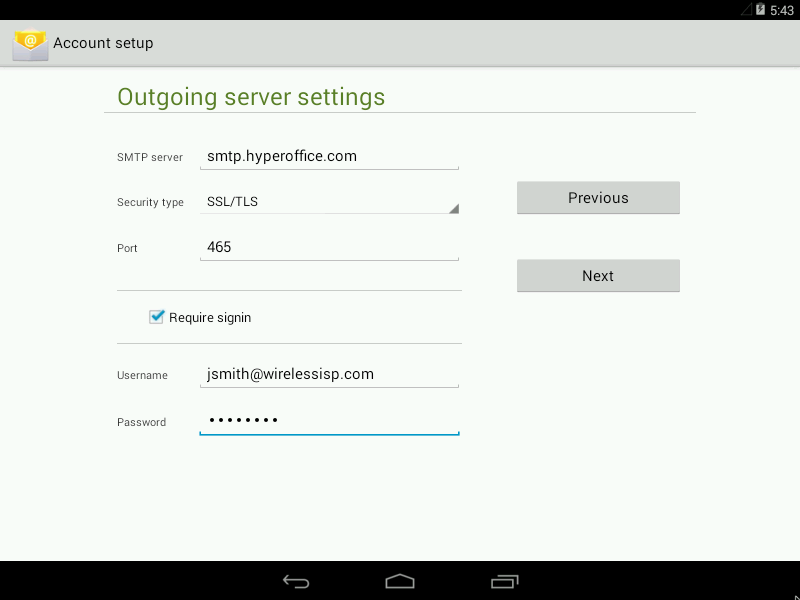
- SMTP server: smtp.securedurl.com or your Service Provider's SMTP mail server
- Security Type: SSL/TLS
- Port: 465
- Require sign in
- Username: Your entire email address
- Password: Password used to log into your portal
- Click Next
- The following screen are personal settings you can set at your own discretion.
*This article is based on Android 4.4.2
To set up IMAP on a BlackBerry, follow these steps:
- Swipe down from the homescreen and select Settings
- Scroll down and tap Accounts
- From the bottom menu tap Add Account
- From the bottom menu tap Advanced
- Tap the IMAP account type
- Enter your email address in the Username field
- Enter your email address in the Email Address field
- Enter your password in the Password field
- Enter your Service Provider's IMAP mail server (e.g. imap.hyperoffice.us) in the Server Address field
- Confirm that SSL is selected for Encryption and the Port is set to 993
- Enter your Service Provider's SMTP mail server (e.g. smtp.hyperoffice.us) in the SMTP Server Address field
- Confirm that SSL is selected for Encryption and the SMTP port is set to 465
- Modify the Sync Interval and Initial Retrieval Amount if desired
- Tap Done from the top right corner or Save from the bottom right corner