MobileSync is a mobile synchronization system that enables both personal and shared workspace information to be synchronized simultaneously. This ensures that you have all your data available at your fingertips. Real-time push messaging and over-the-air (OTA) synchronization allows access to emails, attachments, contacts, calendars, tasks and notes* from a mobile device.

To set up MobileSync, first configure a device following the instructions below for your device. This can be a smartphone an iPhone, Samsung Galaxy (Android), BlackBerry** or a tablet like an iPad or Samsung Galaxy Note.

iPhone, iPad, iPod Touch [iOS]

To set up Mail, Contacts and Calendars on your iPhone, iPad, or iPod Touch, follow these steps

  1. On the device home screen, tap Settings, then tap Mail, Contacts, Calendars

  2. Tap "Add Account" and select Exchange as the type of account.

  3. In the Email and Username field, enter your email address and password used to log into your account.


  4. You may see an "Unable to verify certificate" warning when you proceed to the next step; tap Continue.


  5. When the Server field appears, enter sync.securedurl.com. Depending on your country or region, you may be required to enter a Domain. Enter the domain part of your email address or the address of your portal (e.g. emailplus.hyperoffice.us).

  6. Tap "Next" at the top of your screen again and select the services (Mail, Contacts, Calendars) you wish to sync.

NOTE: Unless you wish to delete all the existing contacts and calendars on your phone, select the "Keep on my iPhone" option when prompted. There may be duplicate contacts on the device as a contact can exist on the local "On My iPhone" account as well as in the newly created Email Plus (Exchange) account. Optionally, iOS can link contacts to display as a unified contact in the address book.

Upon successful configuration on the iOS device, synchronization will begin automatically.

Android

To set up your email, contacts, and calendars on an Android phone or tablet, follow the steps for your make:

Google

  1. From the Home screen, click Settings icon
  2. Select "Add account"
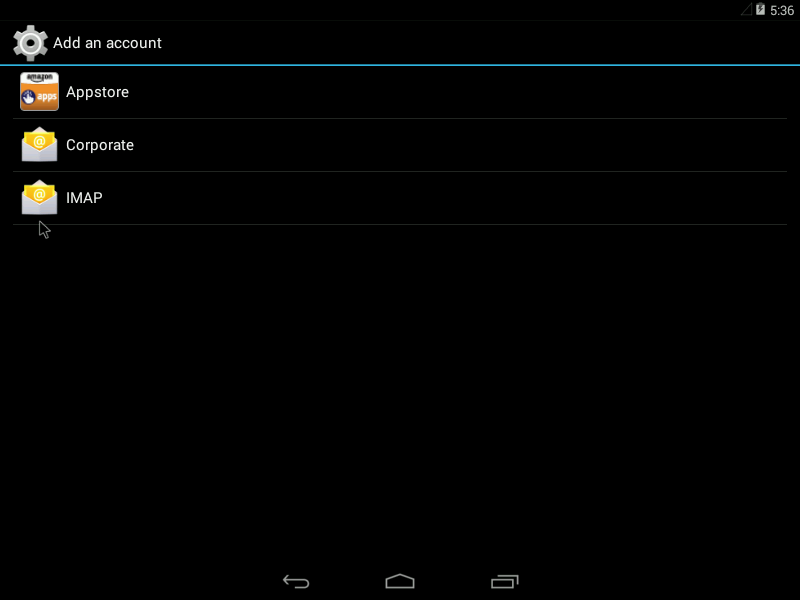
  3. Select Corporate

    Add an Account

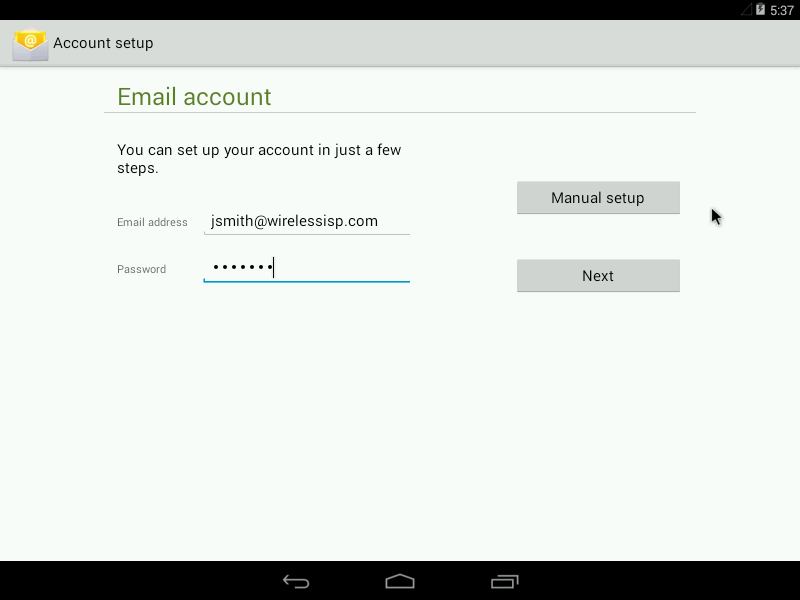
  4. On the following screen, enter your full email address (e.g. This email address is being protected from spambots. You need JavaScript enabled to view it.) and password and click, "Manual Setup"

    Account Setup

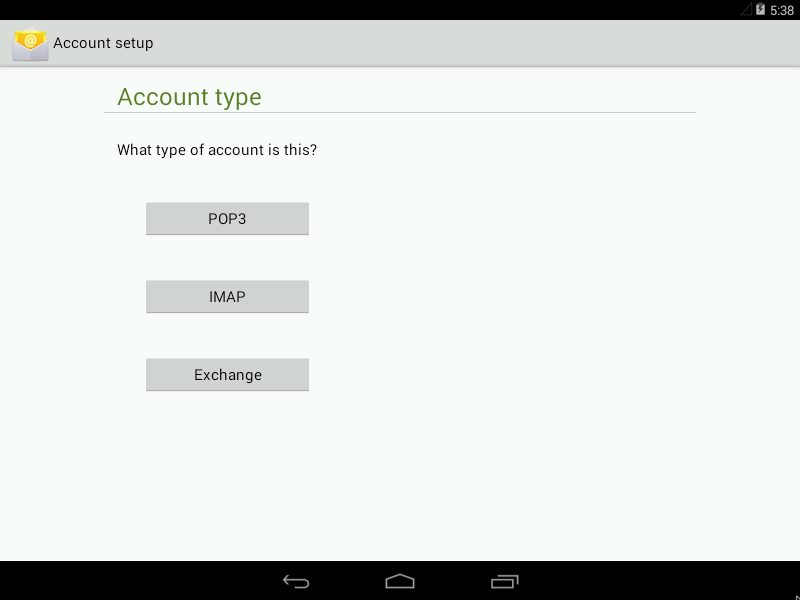
  5. Select Exchange

    Account Type

  6. One the following screen, enter and verify the following information:


  7. Click Next
  8. The following screen are personal settings you can set at your own discretion.

*This article is based on Android 4.4.2 from the Android SDK.

Samsung

  1. From the Home screen, click Settings icon
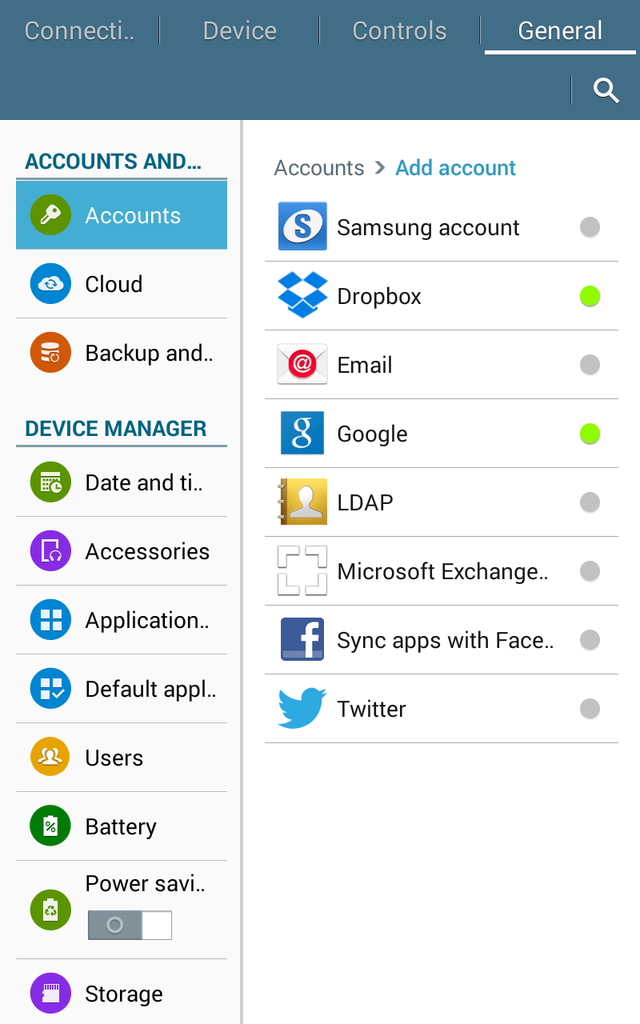
  2. Select "Add account"
  3. Select Microsoft Exchange ActiveSync

    addaccount.png


  4. On the following screen, enter your full email address (e.g. This email address is being protected from spambots. You need JavaScript enabled to view it.) and password and click, "Manual Setup"

  5. One the following screen, enter and verify the following information:


  6. Click Next

  7. Your device may prompt you for activation:


  8. The following screen are personal options you can set at your own discretion.

*This article is based on Android 4.4.2 running on a Samsung Galaxy tablet.

HTC

  1. From the Home screen, click Settings icon
  2. Select "Add account"
  3. Select Microsoft Exchange ActiveSync


    If you are already in your mail client, you can tap the top right to access "Add Account"


  4. One the following screen, enter and verify the following information:


  5. Click Next

  6. The following screen are personal options you can set at your own discretion.

  7. Lastly, name your account for easy reference.

*This article is based on Android 5.0.2 running on an HTC One M8.

BlackBerry 10

To add your email, contacts, and calendars to your BlackBerry 10:

  • Swipe down on the phone to access settings.
  • Tap "Accounts."
  • Tap "Advanced."
  • Tap "Microsoft Exchange ActiveSync" and use these credentials (where applicable):
    • Description: This is for personal reference
    • Domain: Leave blank
    • Username: Enter a full email address
    • Email Address: Same as username
    • Password: Password used to log into the portal
    • Server Address: sync.securedurl.com
    • Port: 443
    • Use SSL: ON
    • Use VPN: OFF
    • Use Push: ON
  • Sync Interval: Unavailable when Push is on
  • Sync Timeframe: at your discretion
  • Enable:
    • Mail
    • Contacts
    • Calendars
    • Tasks - Unavailable at this time
  • Tap "Done"

Setting this account's email, calendars and contacts as the default on the phone will ensure that email sent out, calendar events added and contacts added are synced with your account.

Windows Phone

Windows Phone

To set up an Exchange account
  1. On Start, flick left to the App list, tap Settings, and then tap "Email & accounts."
  2. Tap Add an account > Outlook.
  3. Tap the Email address box, and enter your email address.
  4. Tap the Password box, and enter your Exchange password.
  5. Tap Sign in (you’ll be prompted for more information).
  6. Continue to the next step.
  7. On the Outlook screen that asks you to check your information, enter the following, and tap Sign in.
    • You may need to tap Advanced in order to enter server information
    • You may need to tap Show All Settings in order to verify encryption is checked.
  8. Email Address: Enter your full email address
  9. Server address: sync.securedurl.com
  10. If given an SSL option, choose required.
  11. Enter in the portal's login URL for the domain (e.g. corpco.hyperoffice.com).
  12. Enter in the username used to access the portal for username.
  13. Enter in the password used to access the portal for password.

After a device(s) has been configured:

MobileSync Configuration [Portal]

  1. Go to the Synchronization configuration located under the username drop-down.

  2. If no devices have been configured yet to this account, a welcome screen will appear:


  3. After a device has been configured, they will appear on the MobileSync configuration:


  4. Each device will be identified by a unique device ID and type (e.g. iPhone 5, iPad, etc.) To configure which data will be synchronized with the device, click "Configure" next to the device for the configuration pop-up and select which types and which workspaces to sync with the device. Also select a default location for where to write information from your device. A device can be set to write to only one location between personal or workspaces. This means that when adding a calendar event or a contact to this account from a device will write the event or contact to the default location.


  5. To remove a device, click "Remove" and confirm on the following pop-up window:


  6. When devices are configured, they will always appear in the MobileSync configuration page. If all devices are removed, the welcome screen will appear again when accessing the MobileSync configuration page.

*A Windows Phone is required for Notes synchronization.

**For users with legacy BlackBerry devices (pre BlackBerry 10), installing a sync client is required to synchronize data between the portal and the device. Click on the link provided in the MobileSync configuration to install the sync client for legacy BlackBerry devices.